Custom Raspberry Pi HAT Design: A Practical Guide
From schematic to shipped product — what we've learned designing custom HATs for production hardware.

There's a moment in almost every Pi-based hardware project when the team looks up from the component catalog and realises: no existing HAT does exactly what they need. Maybe the required I/O combination doesn't exist commercially. Maybe the operating temperature spec rules out every consumer option. Maybe the form factor simply won't fit the enclosure.
At DigitalMonk, we've been through that moment on multiple projects — and we've designed custom Raspberry Pi HATs to get past it. The process is more accessible than most teams expect, but it carries real decisions that don't show up in datasheets: component lifecycle management, EMC layout discipline, DFM trade-offs, and the perennial question of whether you're actually ready to leave the breadboard behind.
This guide covers the full picture — what a custom HAT design actually involves, where most projects get surprised, what it costs, and when the honest answer is "off-the-shelf is fine." If you need a team with direct HAT experience to take this from schematic to prototypes, our hire Raspberry Pi developers who design custom HATs page has the specifics.
What is a Raspberry Pi HAT?
HAT stands for Hardware Attached on Top. The Raspberry Pi Foundation formalised the HAT specification in 2014 alongside the Model B+. A compliant HAT is a board that satisfies four requirements:
- ①Connects via the Pi's 40-pin GPIO header
- ②Follows the 65 mm × 56 mm PCB footprint with matching M2.5 mounting holes
- ③Carries an ID EEPROM on I2C bus 0 (pins 27/28) for automatic device tree overlay loading
- ④Uses a stackable or right-angle header so the Pi sits underneath
The ID EEPROM requirement is what separates a strict HAT from a "HAT-compatible" board. In practice, most custom hardware designed for the Pi skips the EEPROM entirely, especially for internal products. The Pi boots fine without it; the EEPROM is most useful for consumer-facing hardware that needs automatic driver loading on first connection.
The 40-pin GPIO header exposes UART, SPI, I2C, I2S, PWM, and general-purpose I/O — enough for a wide range of sensor and control applications. Power comes from the 5V pins and the 3.3V regulated rail, both of which have practical current limits that any HAT design must budget against carefully.
A compatibility note worth making explicit: the 40-pin HAT spec works across Pi 2B through Pi 5 and Zero 2W without modification — provided the GPIO functions used are consistent across models. The Pi 5 introduced peripheral changes via the RP1 I/O controller; verify GPIO assignments against the Pi 5 BCM2712 documentation if that model is in scope.
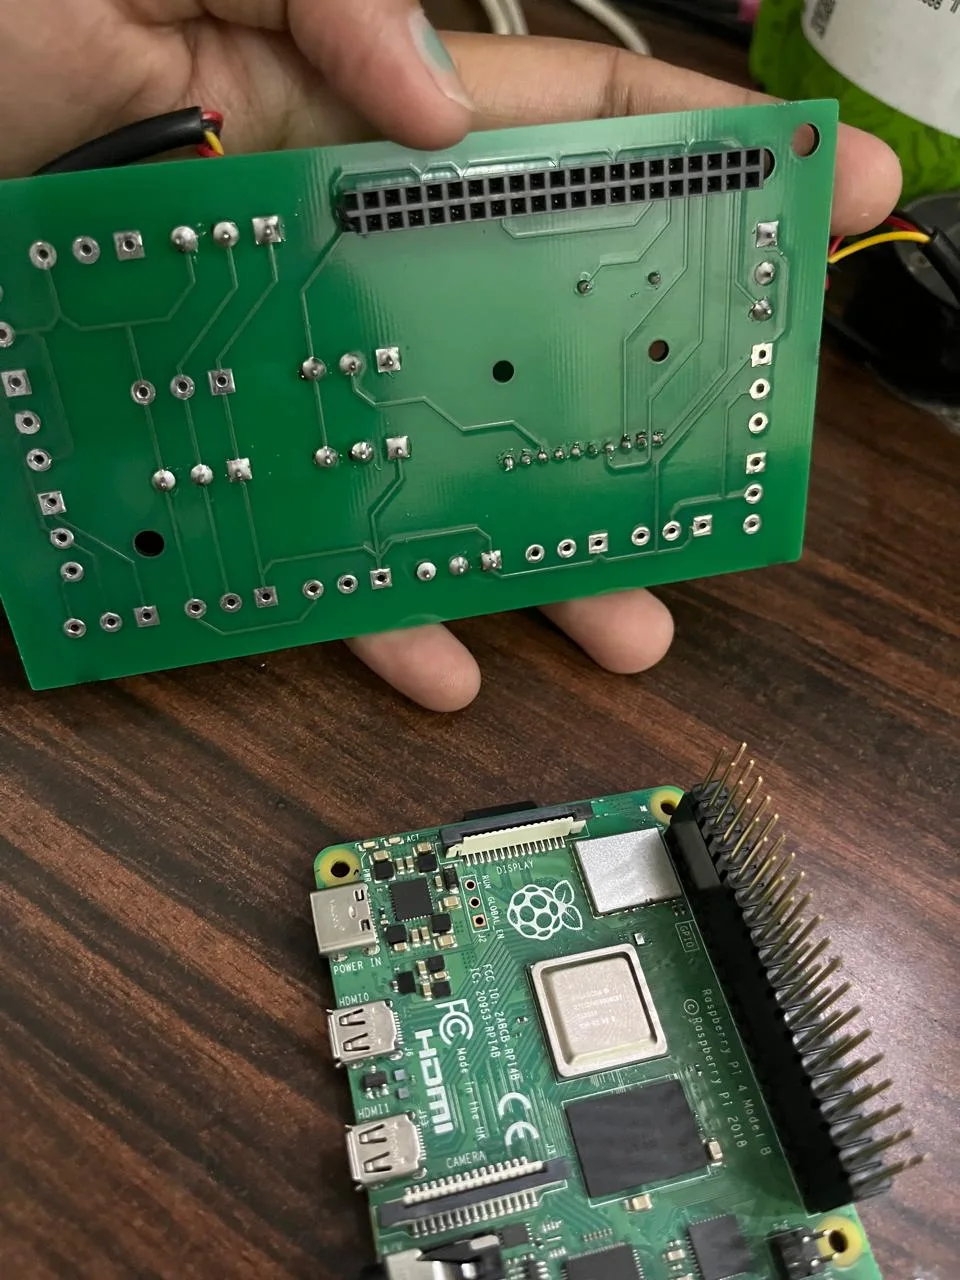
Custom Raspberry Pi HAT showing 40-pin GPIO header connecting to Raspberry Pi 4 Model B
When Off-the-Shelf HATs Fall Short
Off-the-shelf HATs cover a lot of ground. ADC HATs, relay HATs, CAN bus HATs, LoRa HATs, display HATs — for many applications, especially prototypes and internal tooling, an existing board gets you 90% of the way there faster than a custom design ever could. We say this honestly because we've seen teams go custom when they didn't need to, and the extra time always costs them.
That said, there are six scenarios where off-the-shelf genuinely falls short:
- 1Specific I/O combinations that don't exist commercially
Your product needs four isolated analog inputs, two relay outputs, and a CAN bus interface on a single board. That combination doesn't exist in any catalog. Stacking three separate HATs introduces mechanical instability, power management complexity, and an enclosure that's 30 mm too tall.
- 2Industrial environmental requirements
Commercial HATs are rated for 0–70°C. Industrial and outdoor deployments regularly see −20°C to +80°C. Extended-range components, conformal coating, and vibration-rated connectors don't come on a standard Pi HAT.
- 3Form factor constraints
If your enclosure has a specific cutout, or your stacked board needs to match a DIN rail module footprint, custom is the only path. The 65×56 mm spec is a standard for commercial boards — not a constraint on custom designs.
- 4Cost optimisation at volume
Below roughly 500 units, off-the-shelf is almost always cheaper when you factor in engineering time. Above that threshold, the economics often flip. At 1,000 units, a custom board designed for your exact application can be significantly cheaper per unit than buying a commercial HAT — especially once you strip out components you don't need.
- 5Certification requirements
EMC certification (CE, FCC), medical device compliance (IEC 60601), or industrial standards (IEC 61010) often require control over every component on the board. You can't certify around a HAT you didn't design.
- 6Long-term supply chain control
Commercial HATs get discontinued. If your product has a 5+ year lifecycle, owning your BOM — choosing components with long availability commitments and identified second sources — is the only way to guarantee continuity without a hardware redesign mid-production.
The Custom HAT Design Process
A custom HAT moves through four phases: schematic design, PCB layout, fabrication, and testing. Each phase has its own decision points and its own places where projects most commonly go sideways.
Schematic Design
Every custom HAT starts on paper — or a whiteboard — before EDA software opens. We map the full I/O requirements, power budget, and GPIO assignments against the Pi's pinout before placing a single component.
GPIO conflict avoidance is the first real design constraint. I2C is on pins 3/5, SPI on 19/21/23/24/26, UART on 8/10 — shared resources that must be planned early. Multiple I2C devices mean address assignments are resolved at schematic stage, not at bringup. Two devices that both respond to 0x48 don't co-exist without a multiplexer, and discovering that at bringup adds a PCB revision.
Power budgeting matters just as much. The Pi's 3.3V rail is limited; the 5V rail depends on what's powering the Pi itself. HAT designs that load the 3.3V rail heavily under peak current draw can cause the Pi to brownout — we've debugged this in production, and it's one of the harder problems to trace without a bench supply with current logging.
Component selection priorities: lifecycle first, then second sources. We've been caught out by ICs that were available at design time and obsolete six months into production. Every critical component on a production HAT should have at least one alternate source. A compliant HAT also includes an ID EEPROM — a 24Cxx-series device on I2C_0 at under $0.30 — which we include by default. This is also the stage where we validate the circuit concept following the breadboard-to-PCB prototyping workflow — verifying the circuit on loose wiring before committing anything to a board.
PCB Layout
Layout is where most of the real work happens — and where most first-time HAT designers get surprised by how much the physical decisions matter.
The 4-layer vs 2-layer decision is driven by signal integrity and EMC targets. For a simple ADC or relay HAT, 2-layer is often sufficient and roughly half the bare board cost. For anything with high-speed SPI, differential signals, or hard radiated emission limits, a 4-layer board with dedicated ground and power planes is worth the cost premium — it's much cheaper to add the layers in layout than to fix EMC failures in a compliance chamber.
Thermal behaviour under a stacked board is easy to overlook. The HAT sits directly above the SoC on a Pi 4, absorbing heat from below. We've seen HATs run fine on Pi 3 and become thermally unstable on Pi 4 purely because of heat soak from the SoC underneath. Leave thermal relief around heat-generating components, and avoid placing temperature-sensitive parts directly in the SoC's shadow.
EMC layout discipline — ground plane continuity, return path control, and proper decoupling at every IC — determines whether the board passes pre-compliance scans. We use a KiCad footprint that models the Pi 4 as a mechanical reference layer to catch clearance errors before layout is finalised. Standoff heights, connector clearances, and the keepout zone around the Pi's USB and Ethernet ports are all checked before Gerbers go out.
Fabrication
For prototypes, we use domestic PCB fabs (5–7 business days) rather than overseas options (3–4 weeks), because iteration speed at prototype stage matters more than cost. For production quantities above 50 units, the economics shift to overseas assembly houses where PCBA costs are substantially lower.
DFM review happens before Gerbers go out — minimum trace widths, via drill sizes, solder mask clearances, courtyard overlaps. Most EDA tools have DRC rule sets for common fabs. Run them every time. The rejection that turns a 5-day lead time into a 2-week lead time is almost always a clearance violation the DRC would have caught.
Component sourcing runs in parallel with board fabrication. On a first prototype, we order all parts the day Gerbers go out — not the day boards arrive. For first-article quantities, 5–10 boards is standard: enough for functional testing, one or two to stress-test, and a couple of spares for when the magic smoke inevitably escapes one unit.
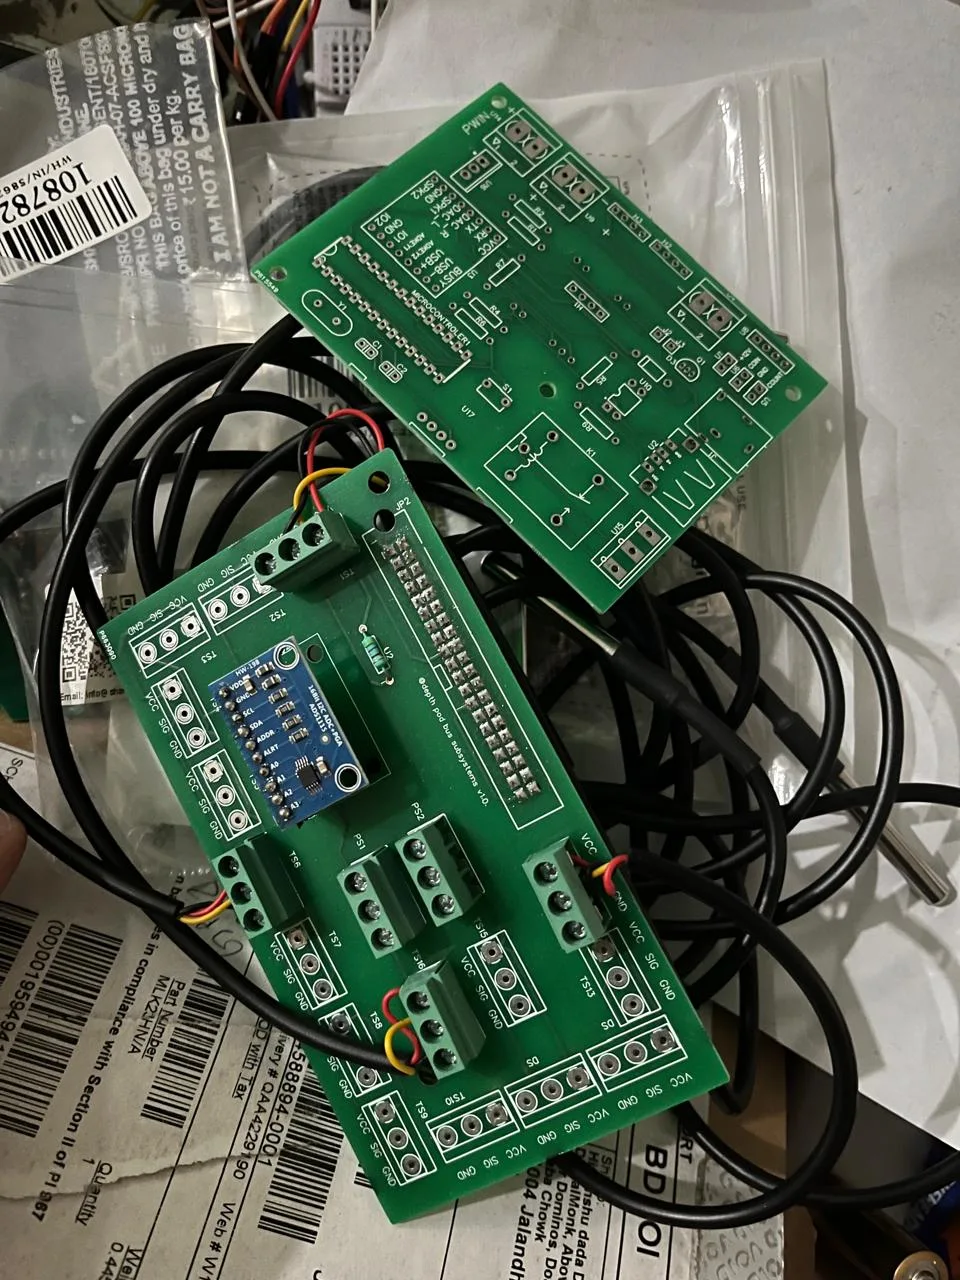
Two custom Raspberry Pi HAT PCB designs showing different I/O configurations developed by DigitalMonk
Testing & Validation
First power-on is always with a current-limited bench supply — no Pi attached. Verify voltages at every test point before anything else. We've caught reverse-biased diodes and wrong-value pull-ups this way that would have destroyed a Pi board without the current limit.
After power-on verification, we test each subsystem independently before running integrated tests. I2C devices get scanned with i2cdetect. SPI peripherals get loopback tests. ADC channels get known reference inputs. Only after all subsystems pass individually do we run functional tests with the full software stack.
EMC pre-compliance scanning — a near-field probe pass before committing to a full anechoic chamber test — catches layout problems early. It's not a substitute for formal certification, but it's a roughly $500 investment that can prevent $5,000 in failed chamber runs. We follow up with thermal imaging under load, then 72-hour burn-in for any board heading into production. Infant mortality on PCBAs is real; burn-in catches solder joint failures before the boards leave the lab.
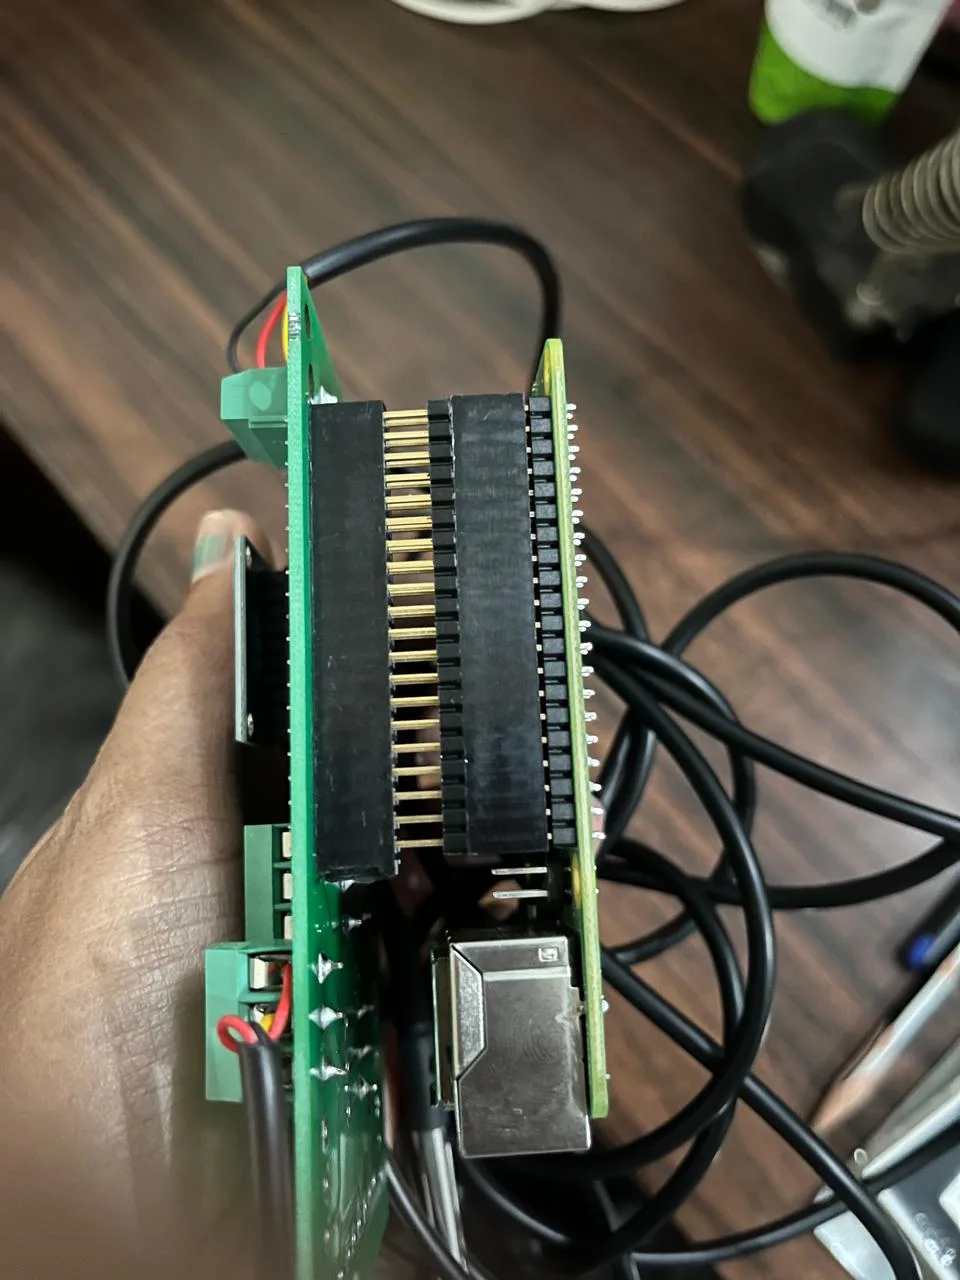
Custom HAT mounted on Raspberry Pi 4 during functional testing at DigitalMonk lab
Real-World Examples from Our Work
The principles above aren't theoretical. Here are two condensed examples from DigitalMonk deployments, framed generically to protect client confidentiality.
Industrial Locker Management System
Custom Pi hardware interfacing with electromechanical locks, RS-485 RFID readers, and status sensors across a deployed fleet of smart locker units.
Building HVAC Monitoring Gateway
Custom sensor interface board consolidating temperature, pressure, and flow inputs from multiple zones into a Pi-based monitoring gateway.
Industrial Locker System — What We Learned
Off-the-shelf HATs failed this project on two counts: the required I/O combination — isolated RS-485 multi-drop, eight relay outputs, and sixteen digital inputs — didn't exist on any single commercial board, and the −10°C to +60°C operating temperature spec ruled out most consumer options. We designed a custom 4-layer HAT that consolidated all interfaces on one board. The biggest lesson from this project: in an industrial product, connector choice is as consequential as circuit design. The wrong connector family cost us two prototype iterations and three weeks we hadn't budgeted.
HVAC Monitoring Deployment — What We Learned
The circuit itself — 4–20 mA current loop inputs — is well-understood. The challenge was power isolation. Sensors in industrial environments pick up ground loops from three-phase power equipment in the same building. We added per-channel isolation that wasn't in the original scope, which is why it didn't make it into prototype 1. It's the reason we now discuss the full electrical environment before the first schematic line goes down on any industrial project. If you're building similar systems, hire Raspberry Pi developers who design custom HATs with experience across the full hardware stack from day one — not after the first prototype.
Raspberry Pi Hardware Development — DigitalMonk
From custom HAT design through production validation — our hardware team has shipped Pi-based systems across industrial, IoT, and monitoring deployments.
What a Custom HAT Actually Costs
The short version: cheaper at scale than most teams expect; more expensive at low volumes than most teams want. Here are honest estimates based on real projects.
| Cost Category | Typical Range | Notes |
|---|---|---|
| NRE / Engineering design | $4,000 – $15,000 | Simple 2-layer ADC or relay HAT at the low end; 4-layer board with power isolation, multiple comms interfaces, and certification preparation at the high end |
| Prototype build (5 units) | $500 – $2,500 | PCB fabrication plus PCBA. Fine-pitch packages and high component counts push toward the upper end; 0402 passives and SOIC packages stay near the lower |
| Production unit cost (1K+ units) | $15 – $80 | Commodity relays and ADC inputs at the low end; industrial-grade isolated ICs, precision ADCs, or RF components at the high end |
| Certification (if required) | $5,000 – $50,000+ | CE or FCC for a simple IoT product: $5K–$15K. Medical (IEC 60601) or automotive compliance: $30K–$50K+, before any product-specific engineering |
| Timeline | 8 – 16 weeks | Kickoff to verified prototypes. Industrial certification paths, custom enclosures, or additional prototype iterations extend this materially |
Frequently Asked Questions
What's the difference between a HAT and a pHAT?
Do I need a custom HAT or can I prototype on a breadboard first?
How long does it take to design a custom Raspberry Pi HAT?
Can a custom HAT be certified for medical or industrial use?
What happens when a HAT component goes end-of-life?
Should the HAT include its own MCU or rely entirely on the Pi?
Are HATs compatible across all Raspberry Pi models?
How many prototype iterations should I budget for?
Conclusion
A well-designed custom HAT is invisible in the final product — the hardware does exactly what the application needs, fits the enclosure, survives the environment, and ships with a BOM you control. A poorly designed one means field failures traced back to a connector spec nobody checked, a ground loop that breadboard testing would have surfaced, or a component obsolescence that forces a mid-production redesign.
The patterns in this guide — GPIO planning before layout opens, power budgeting in the schematic, DFM review before Gerbers go out, burn-in before production ships — aren't theoretical. They come from the locker system that had to work at −10°C, the HVAC gateway that had to survive ground loops from three-phase equipment, and the first HAT prototype that taught us never to skip the smoke test.
If you're planning a custom HAT and want a team that has already made the expensive mistakes so you don't have to, take a look at what we do at DigitalMonk's Raspberry Pi hardware practice. We work on fixed-scope hardware engagements — schematic through validated prototypes — across the US, UK, and India.
Considering a Custom HAT for Your Product?
Our embedded team has shipped custom Pi hardware across industrial, IoT, and monitoring deployments. Tell us about your I/O requirements, environment, and volume — we'll tell you honestly whether custom is the right call and what it actually takes to get there.
Talk to our Raspberry Pi team →